¶ Avatar HD Goggles X
¶ Main Interface Overview
-
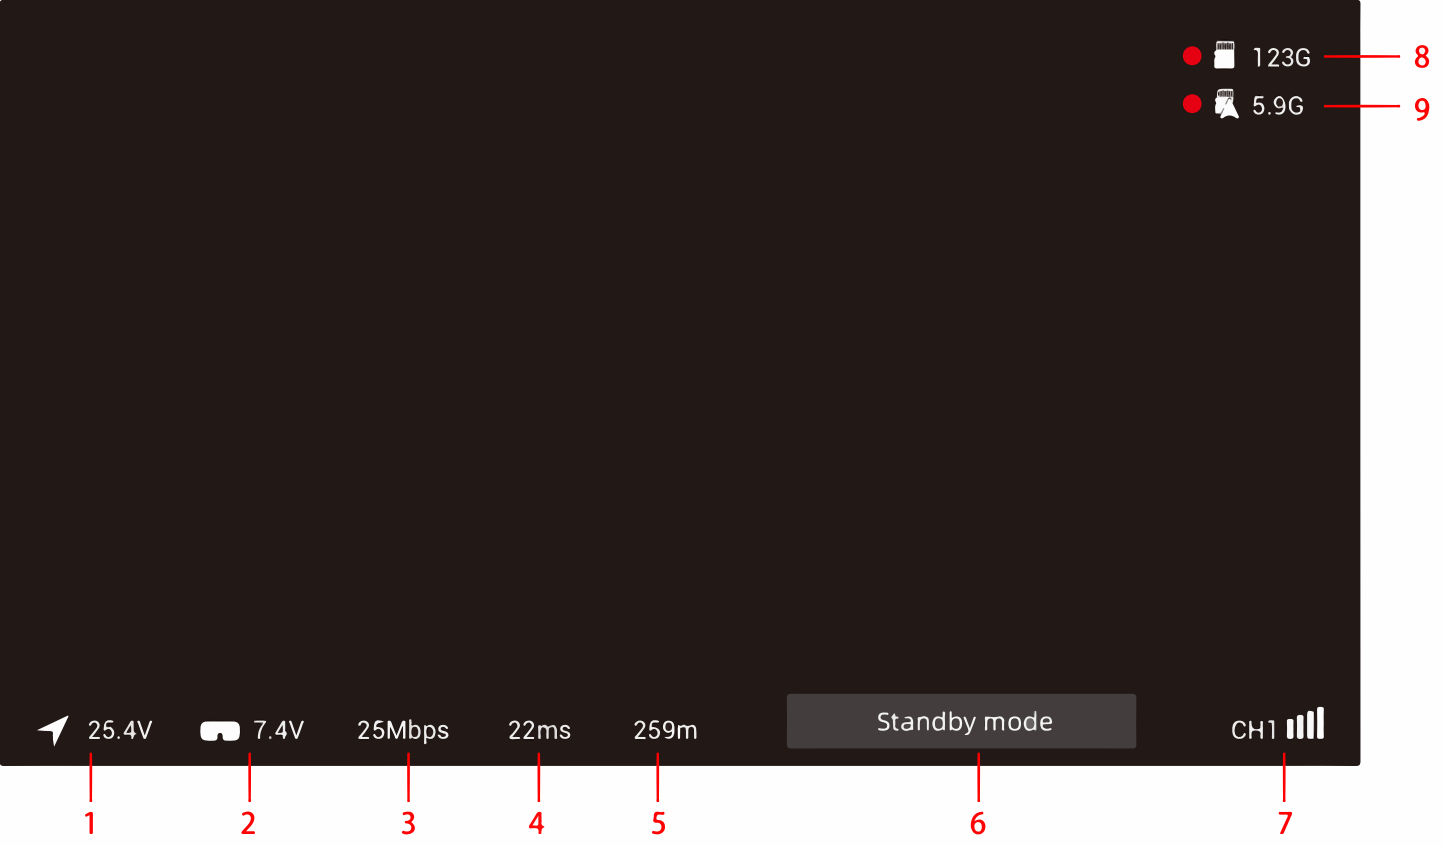
- Air Unit Input Voltage:
Displays the air unit supply voltage and automatically detects 2S, 3S, 4S, and 6S LiPo batteries based on a per-cell voltage range of 3.5–4.2 V. If the voltage of any cell drops below 3.5 V, the value is displayed in red as a warning. Li-ion and LiFe batteries are not currently supported.
- Air Unit Input Voltage:
-
- Receiver Unit Input Voltage:
Automatically detects 2S, 3S, 4S, and 6S LiPo batteries. If the voltage of any cell drops below 3.5 V, the goggles supply voltage is displayed in red and the buzzer sounds an alarm. Li-ion and LiFe batteries are not currently supported.
- Receiver Unit Input Voltage:
A 5S LiPo battery will be detected as a low-voltage 6S battery and will trigger an alarm.
-
- Real-Time Bitrate:
Displays the current transmission bitrate in Mbps. The system supports 25.0 Mbps and 50.0 Mbps display modes.
How Bitrate Works
- Real-Time Bitrate:
-
- System Latency:
Displays the total latency from image capture by the air unit camera to video display on the receiver unit.
- System Latency:
-
- Range Estimation:
Estimates the transmission distance between the receiver unit and air unit based on wireless transmission latency. Signal interference may significantly increase the measurement error.
- Range Estimation:
-
- Status Messages:
Displays current system status notifications and warning messages that require attention.
- Status Messages:
-
- Current Channel:
Displays the currently selected channel. The signal indicator has five states: four bars, three bars, two bars, one bar, and no bars.
- Current Channel:
-
- Receiver Unit SD Card Status:
Displays the status and remaining capacity of the SD card in the goggles. A red circle flashes during recording and is hidden when recording is inactive. If no SD card is detected, NO SD is displayed. When the card is full, — is displayed.
- Receiver Unit SD Card Status:
-
- Air Unit Storage Status:
Displays the status and remaining capacity of the air unit storage. A red dot flashes during recording and is hidden when recording is inactive. If no storage is detected, NO SD is displayed. When the storage is full, — is displayed.
- Air Unit Storage Status:
¶ System Menu – Channel
-
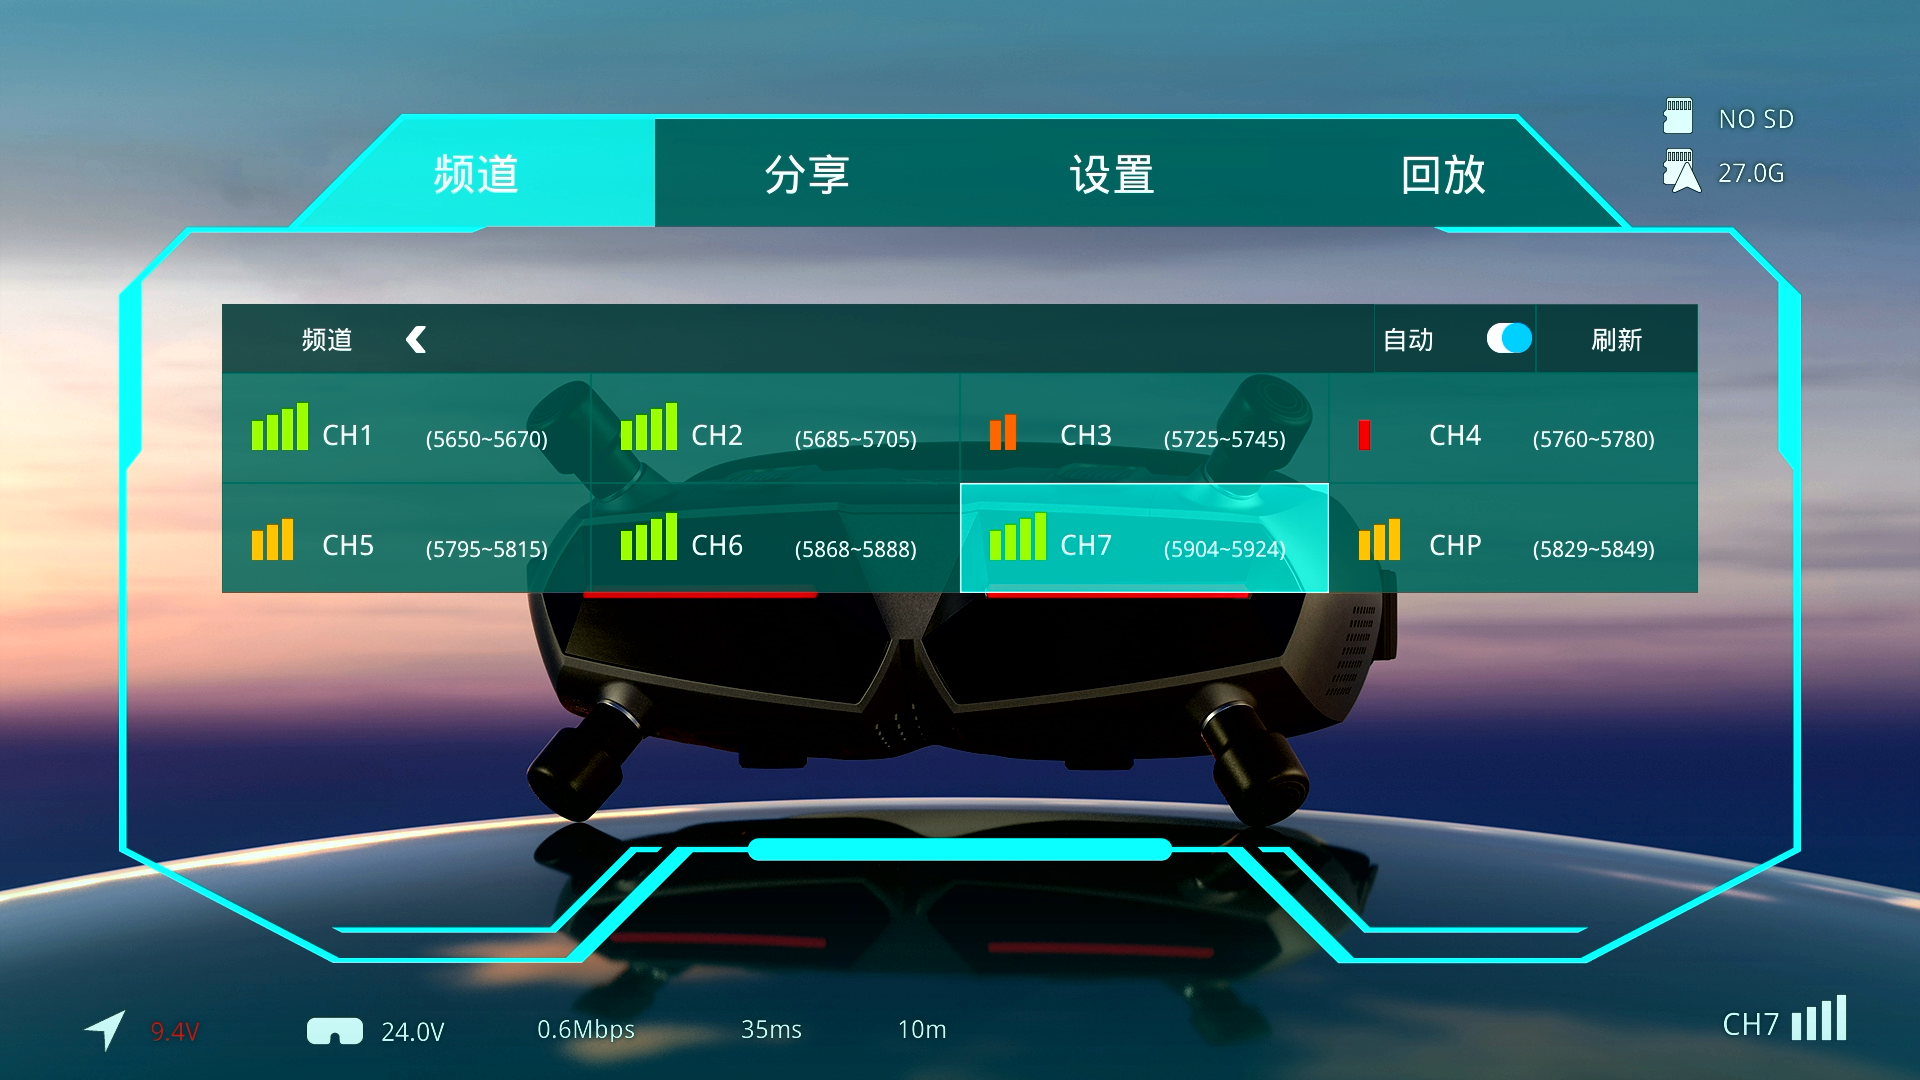
- Channel Interference Status:
Channel conditions are represented by four bars, three bars, two bars, one bar, or no bars. A channel with no bars is occupied and cannot be selected. A white outline indicates the selection cursor. Press the confirm button to highlight a channel; the highlighted channel is the currently active channel.
- Channel Interference Status:
-
- Channel Operating Logic:
When switching between Standard Bitrate Mode and High Bitrate Mode, the current channel is reset to CHP, and a new channel must be selected. CHP is a public channel that is more susceptible to interference and is not recommended for normal flight operation.
- Channel Operating Logic:
The Auto option automatically refreshes the interference status of all channels. The Refresh option performs a manual scan.
-
- Channels Available Under Different Regional Standards:
-
FCC: Eight channels — CH1, CH2, CH3, CH4, CH5, CH6, CH7, and P
-
CE/SRRC: Four channels — CH1, CH2, CH3, and P
-
MIC: Three channels — CH1, CH2, and P
High Bitrate Mode is available only under the FCC standard. When High Bitrate Mode is enabled, the eight FCC channels are reduced to four: CH1, CH2, CH3, and CHP.
The system is configured to the CE standard by default at the factory.
How to Switch Between Regional Radio Standards
¶ System Menu – Share
-
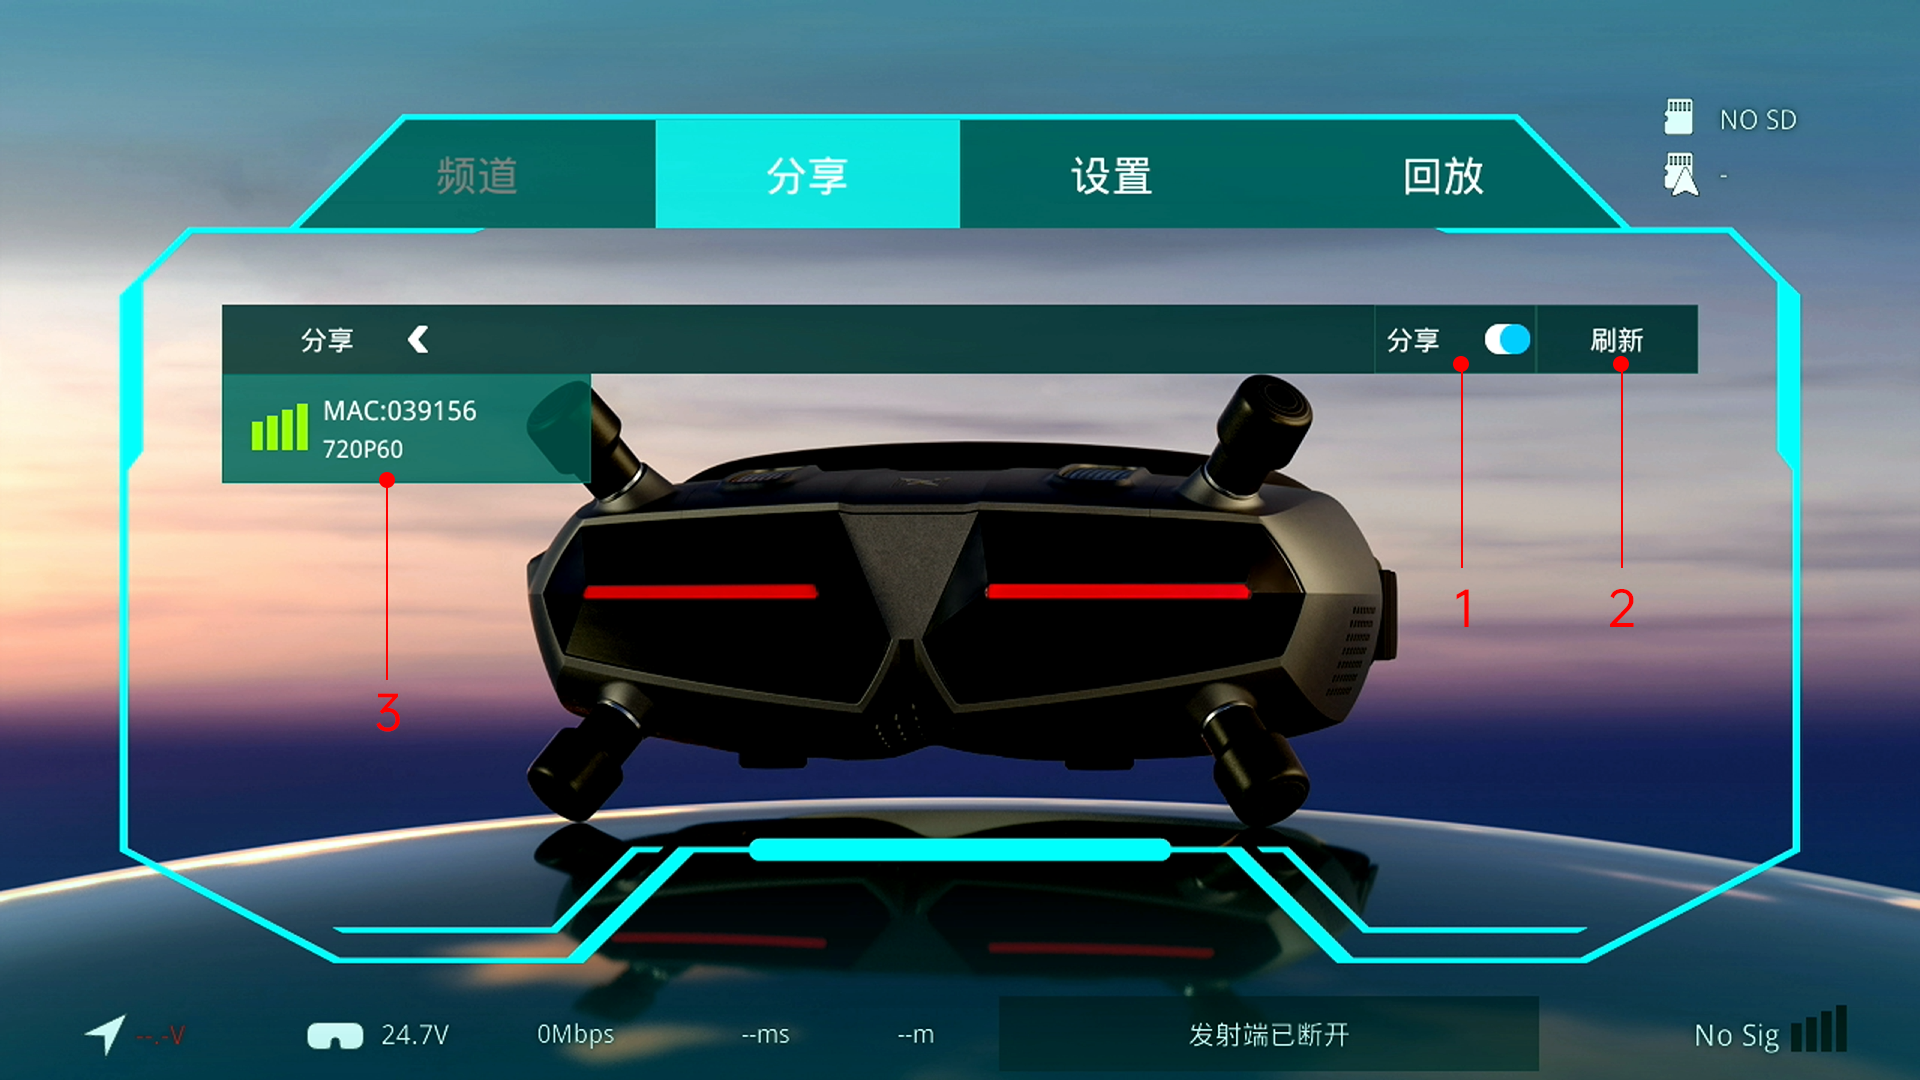
- Share:
Manually enables Sharing Mode and searches for nearby broadcast channels.
- Share:
Sharing Mode requires two Walksnail receiver units. This function cannot be used with only one receiver unit.
-
- Manual Refresh:
Manually refreshes the list of nearby shared channels.
- Manual Refresh:
-
- Select Channel:
Selects a nearby shared channel. A device cannot be found unless its Broadcast function is enabled.
- Select Channel:
¶ System Menu – Settings
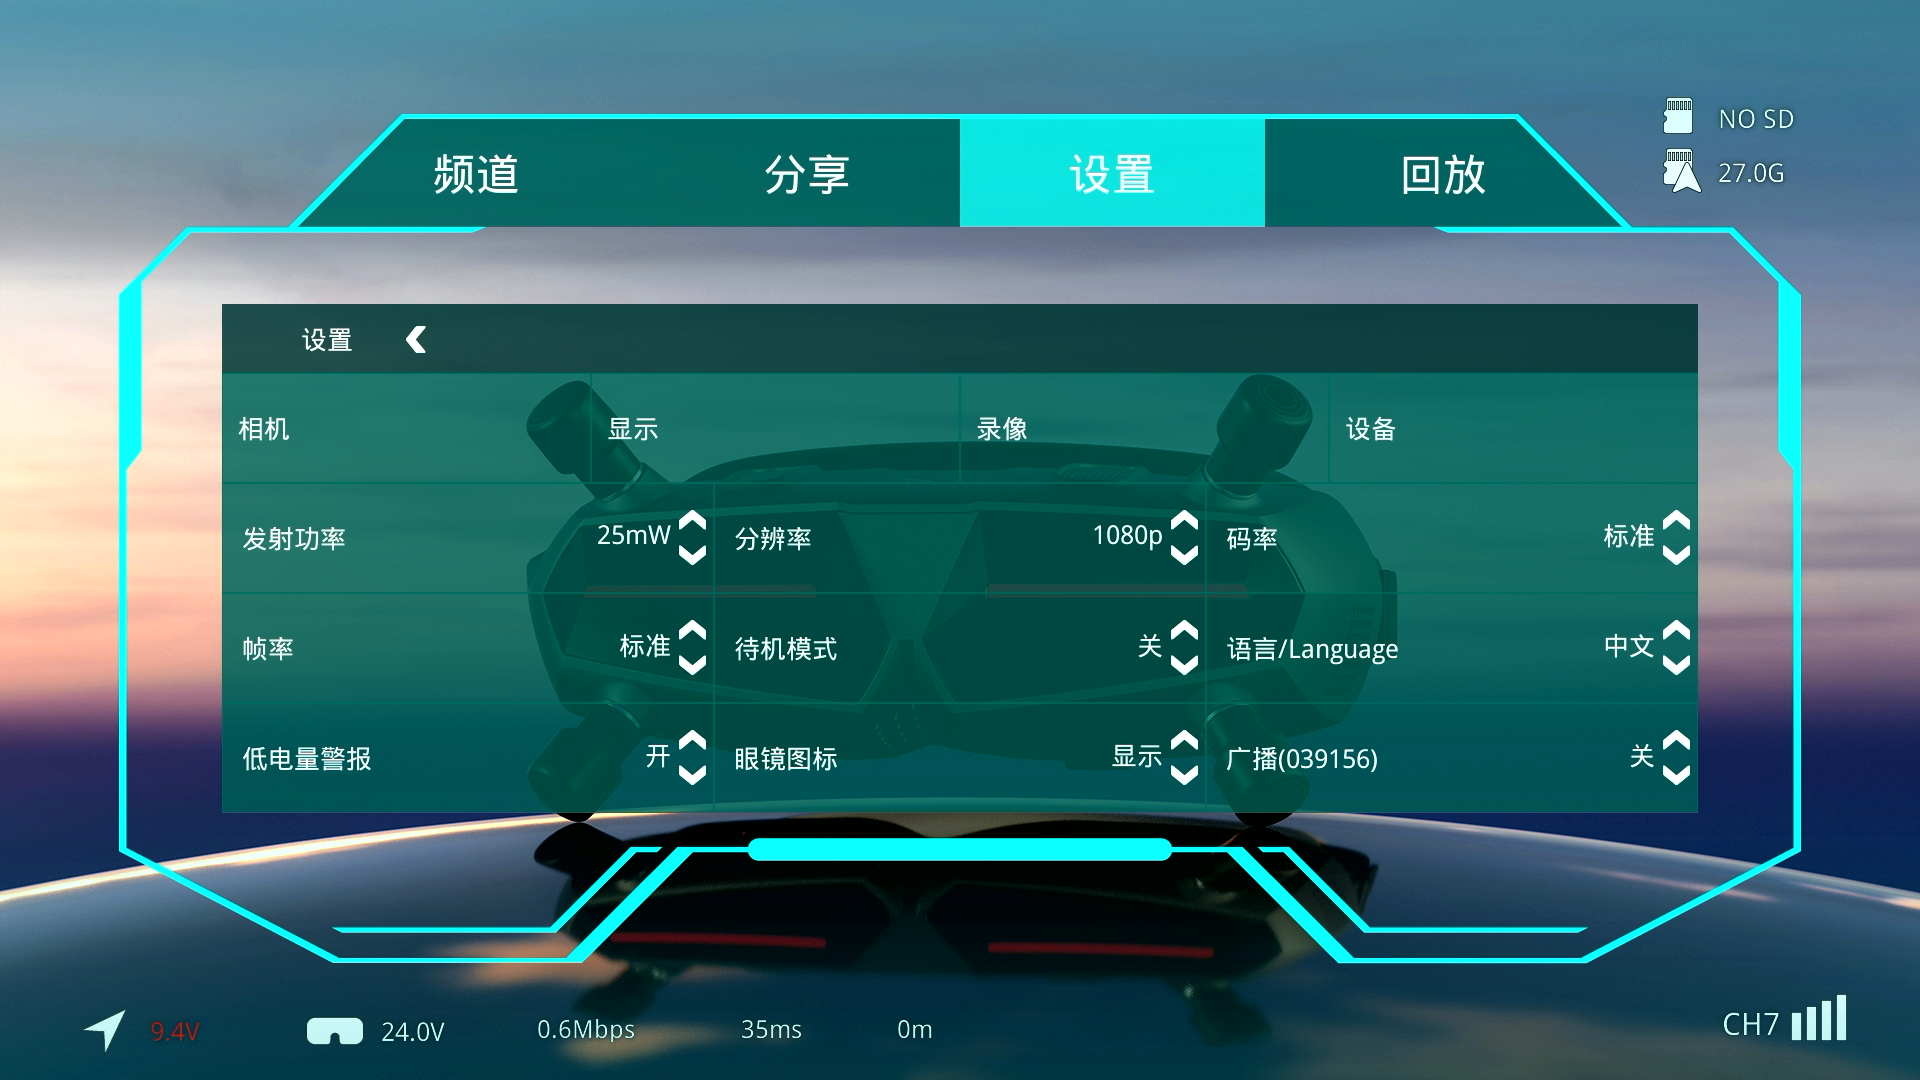
-
- Camera:
Camera settings include Scene Preset, Exposure, Saturation, Sharpness, White Balance, Image Rotation, Aspect Ratio, 3D Noise Reduction, Shutter, Maximum ISO, and other options.
- Camera:
-
- Display:
Display settings include Debug, Screen Brightness, Focus Mode, Custom OSD, OSD Position, Font Update, Custom Font, Framing Guide, and Framing Guide Position.
- Display:
-
- Recording:
Recording settings include air unit recording resolution, recording device, automatic start/stop, loop recording, SD card formatting, air unit storage formatting, built-in EIS stabilization, recording duration, recording format, color, saturation, and sharpness.
- Recording:
-
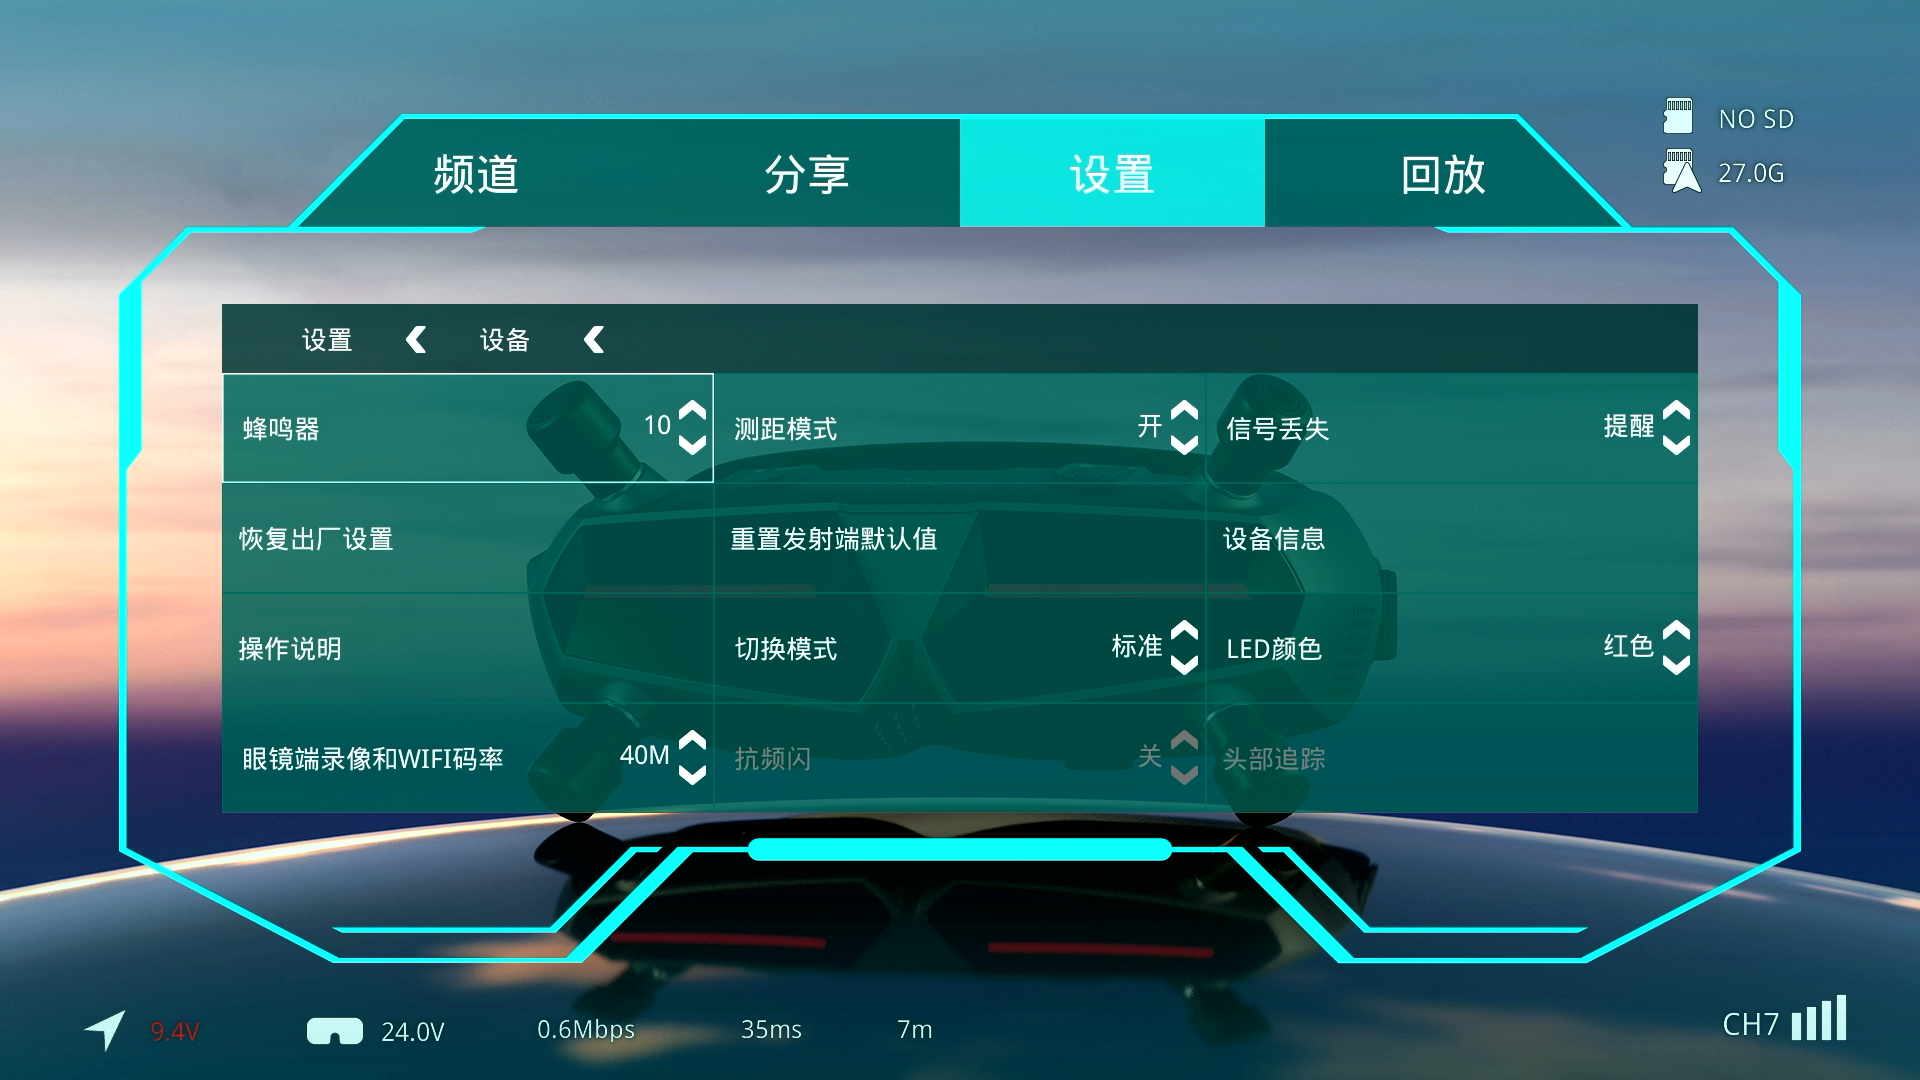
- Device:
Device settings include buzzer volume, Range Estimation Mode, signal-loss warning, factory reset, device information, operating instructions, and system mode selection.
- Device:
-
- Transmission Power:
The default selectable transmission power levels are 25 mW, 200 mW, 500 mW, and 700 mW.
- Transmission Power:
-
- Resolution:
Select between 720p and 1080p. Race Mode supports 480p only.
- Resolution:
-
- Bitrate:
Select Standard Bitrate or High Bitrate for different image-quality levels. High Bitrate Mode is available only under the FCC standard.
- Bitrate:
-
- Frame Rate:
Select Standard Frame Rate or High Frame Rate for different latency characteristics.
- Frame Rate:
-
- Standby Mode:
When Standby Mode is active, the transmission power of both the air unit and goggles is limited to 10 dBm. The currently selected transmission power is applied only after Standby Mode is exited or disabled.
- Standby Mode:
For automatic Standby Mode operation, the air unit UART must be correctly connected to the flight controller. The system automatically exits Standby Mode when the goggles receive an armed-state signal from the aircraft. Disable this function if no supported flight controller is connected.
-
- Language:
Switch between English and Chinese.
- Language:
-
- Low-Battery Warning:
Enables or disables the receiver unit low-battery warning. When the voltage is too low, the voltage value is displayed in red and the buzzer sounds.
- Low-Battery Warning:
-
- Goggles Icons:
Shows or hides system icons on the main interface. The icons can be hidden when using the goggles for live streaming.
- Goggles Icons:
The Flight Controller Control option is not currently functional.
-
- Broadcast:
Broadcast is disabled by default.
- Broadcast:
When Broadcast is enabled, video from your air unit can be discovered by nearby receiver units. The six characters shown in parentheses are the unique identifier of the currently connected air unit.
Broadcast is enabled by default in Race Mode.
¶ System Menu – Settings – Camera
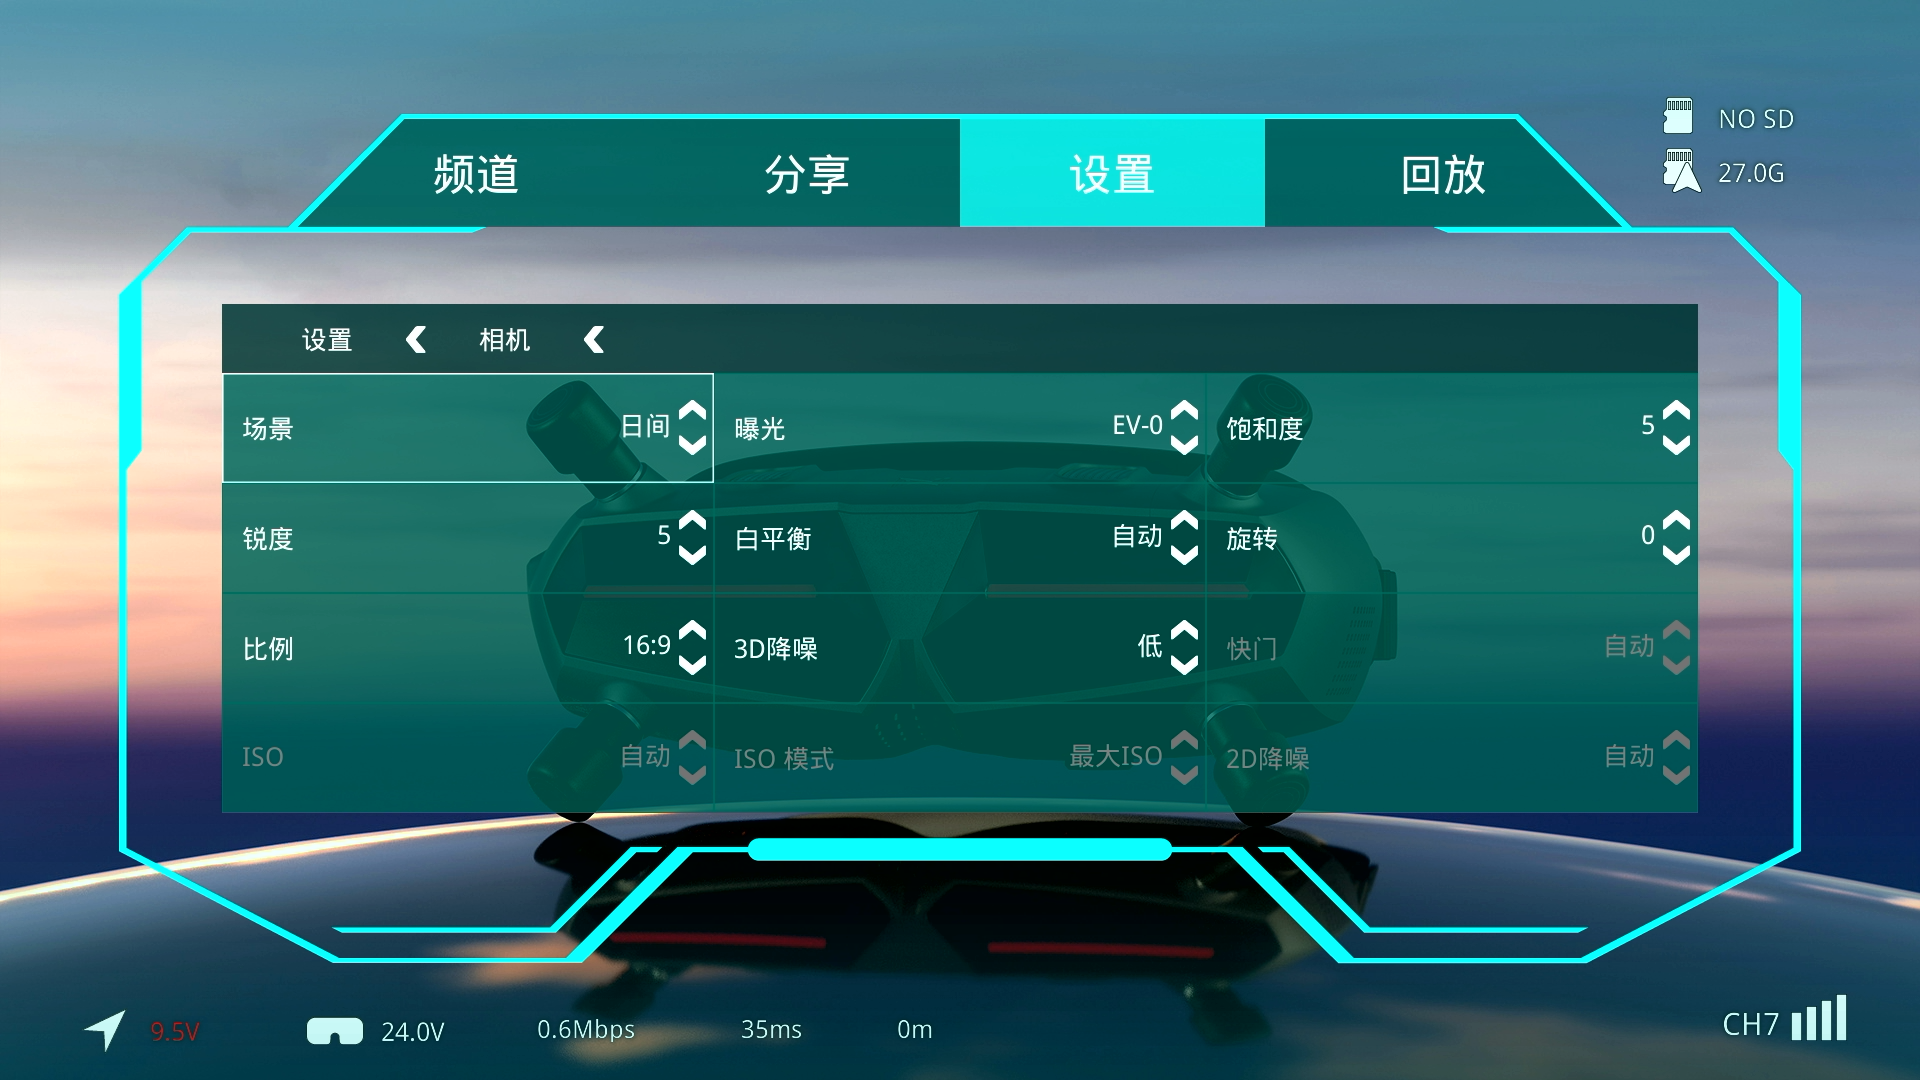
-
- Scene:
Available scene presets include Day, Night, and Race. Only the Moonlight and Pro cameras apply a functional image preset when Night Mode is selected. Other cameras are not affected.
- Scene:
The Race preset is not currently functional.
-
- Exposure:
Adjusts the camera exposure.
- Exposure:
-
- Saturation:
Adjusts color saturation to make colors appear more vivid or more subdued.
- Saturation:
-
- Sharpness:
Adjusts image sharpness to make object edges appear more defined.
- Sharpness:
-
- White Balance:
Adjusts camera white balance. Select Auto or manually adjust the color temperature from 4000 K to 7000 K.
- White Balance:
-
- Rotation:
Sets the camera image orientation to Normal or 180°.
- Rotation:
-
- Aspect Ratio:
Changes the aspect ratio of the image displayed in the goggles and through HDMI output. Available options are 16:9, 4:3, and 4:3 Full.
- Aspect Ratio:
-
- 3D Noise Reduction:
Reduces image noise during camera operation.
- 3D Noise Reduction:
3D noise reduction is stronger than 2D noise reduction, but setting it too high may cause motion trails or ghosting.
-
- Shutter:
Adjusts the camera shutter speed.
- Shutter:
-
- ISO:
Adjusts the camera ISO setting. Select Auto or manually adjust the ISO from 100 to 51200.
- ISO:
-
- ISO Mode:
Select Maximum ISO or Manual.
- ISO Mode:
Example: If ISO is set to Auto and ISO Mode is set to Maximum ISO, automatic exposure gain operates within the ISO 100–51200 range. To limit the maximum ISO, set ISO Mode to Manual and set ISO to 800. The exposure gain will then operate within the ISO 100–800 range.
This function is available only with the Moonlight Kit.
-
- 2D Noise Reduction:
Reduces image noise during camera operation.
- 2D Noise Reduction:
This function is available only with the Moonlight Kit.
¶ System Menu – Settings – Display
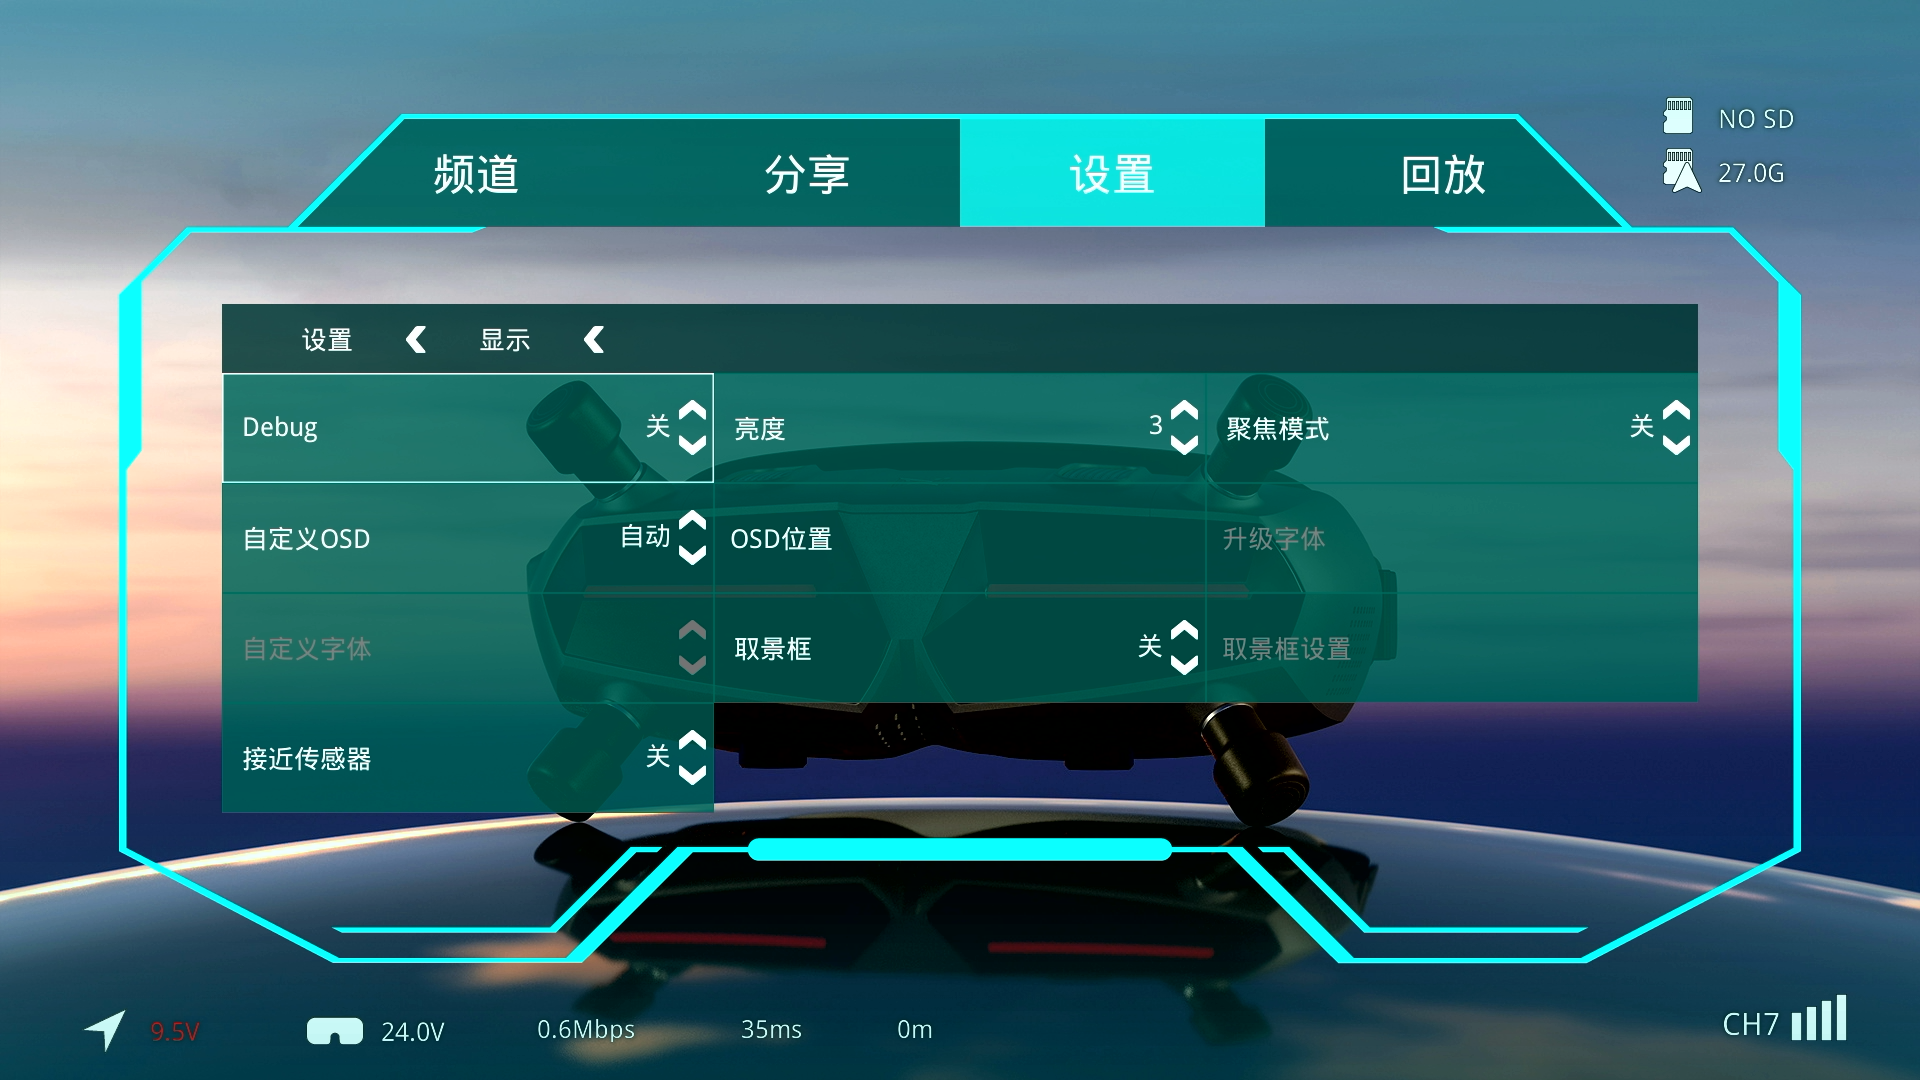
-
- Debug:
When enabled, key system information is displayed on the screen for troubleshooting and analysis. Debug information also replaces the standard subtitle data in the.srtfiles recorded by the receiver unit.
- Debug:
-
- Brightness:
Adjusts the display brightness of the receiver unit. The VRX cannot control the brightness of an externally connected display.
- Brightness:
-
- Focus Mode:
When enabled, the system prioritizes image clarity in the center of the screen under weak-signal conditions. The image at the sides of the screen becomes more pixelated so that the available bandwidth can be used to preserve the central image.
- Focus Mode:
-
- Custom OSD:
The default setting is Auto. The system automatically detects the flight controller firmware connected to the air unit and selects the corresponding OSD font.
- Custom OSD:
Automatic detection currently supports Betaflight, INAV, ArduPilot, KISS, FETtec, and Quicksilver. Fonts for these flight controller platforms are built into the system and do not need to be imported manually.
Custom OSD fonts can be imported if the default font is not suitable.
-
- OSD Position:
Some older or independently developed flight controller firmware supports only 480p analog OSD. For these systems, the overall OSD position can be manually adjusted on the screen.
- OSD Position:
This function can be ignored when using the commonly supported flight controller firmware listed above, as those platforms already support HD OSD.
-
- Font Update:
How to Import OSD Fonts
- Font Update:
-
- Custom Font:
Selects a successfully imported custom font. This option cannot be selected until a compatible font has been imported.
- Custom Font:
Custom font files are stored on the SD card. Removing or formatting the SD card deletes the custom OSD fonts, and the system automatically switches back to the default font.
-
- Framing Guide:
Displays a framing guide to help align an action camera and the FPV camera so that both cameras capture the same subject.
- Framing Guide:
-
- Framing Guide Position:
Moves the framing guide to the desired position on the screen.
- Framing Guide Position:
-
- Proximity Sensor:
Detects whether the user is wearing the goggles and automatically turns the displays on or off.
- Proximity Sensor:
This function is supported only by Goggles X.
¶ System Menu – Settings – Recording
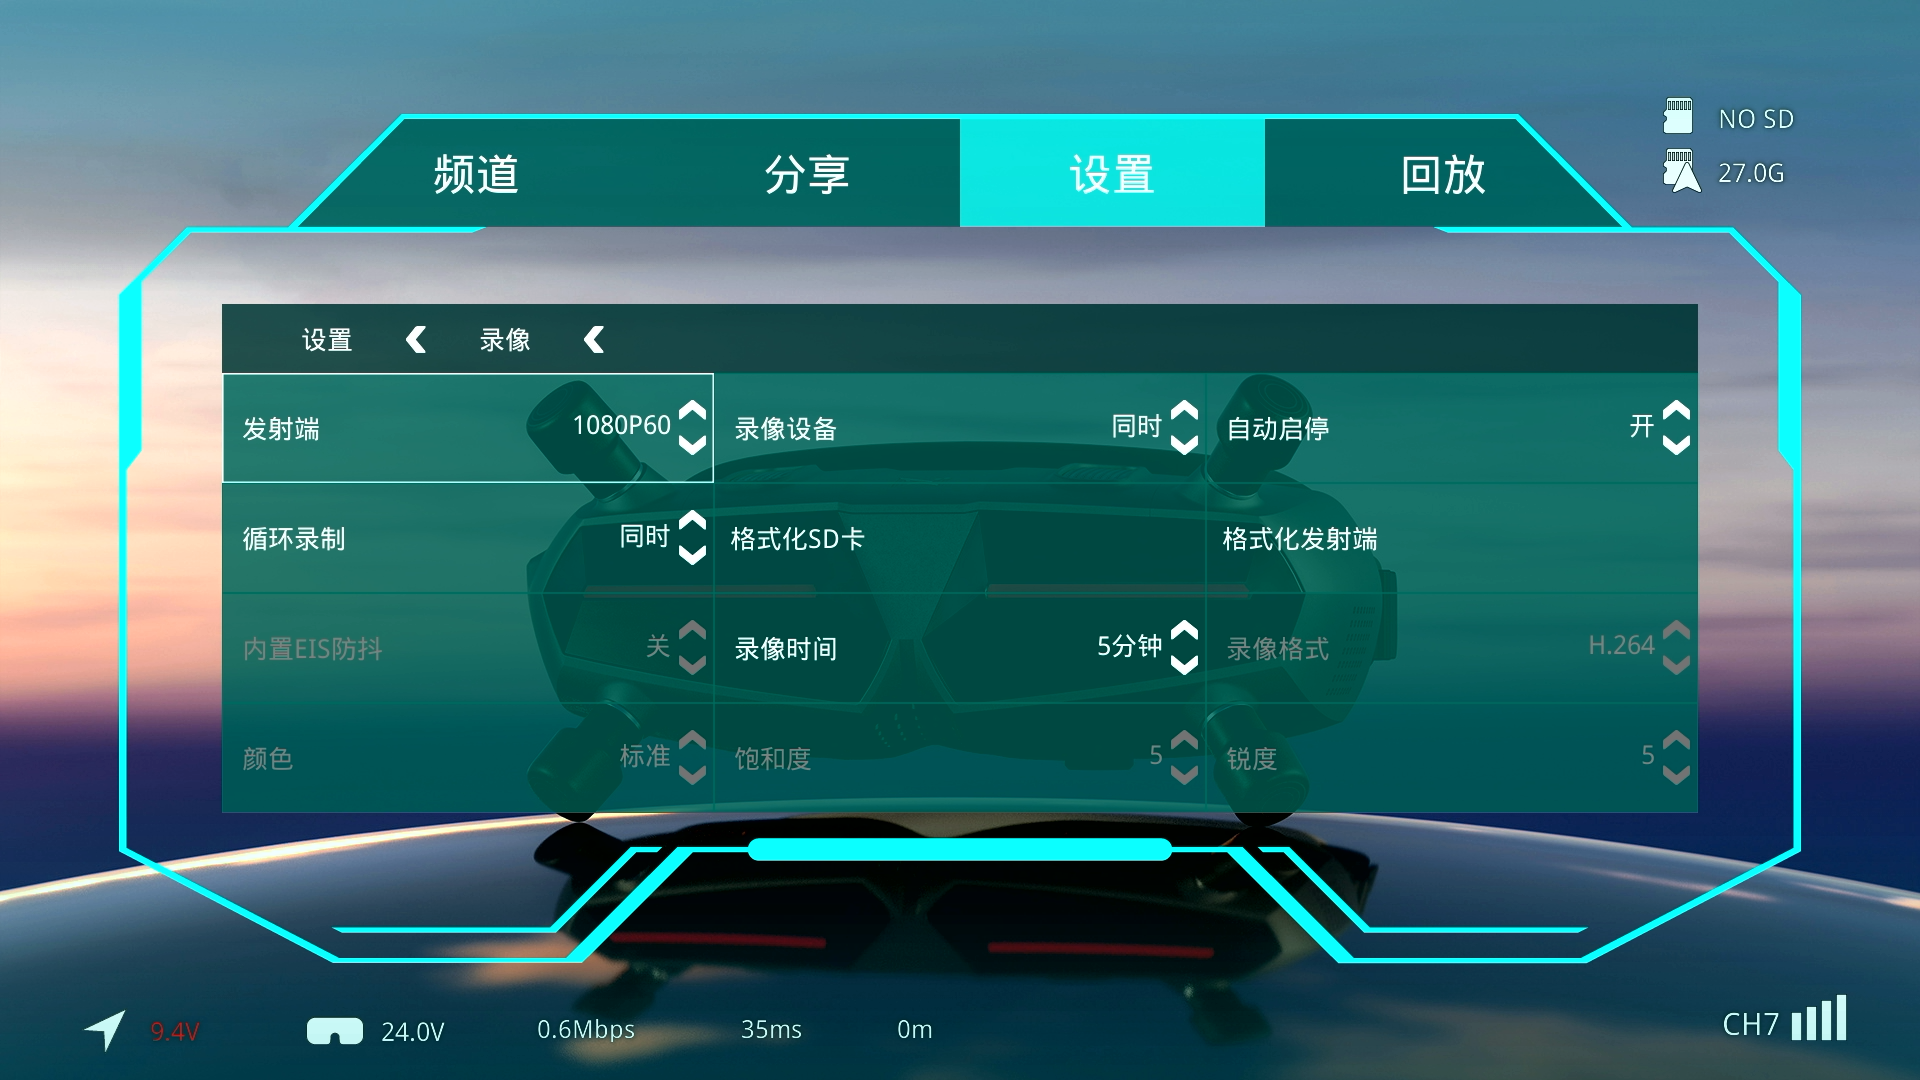
-
- Air Unit:
Changes the recording resolution and frame rate of the air unit.
- Air Unit:
The 4K and 2.7K options are available only when using a Moonlight air unit.
-
- Recording Device:
Selects the recording device. The air unit and receiver unit can record simultaneously or independently.
- Recording Device:
-
- Automatic Start/Stop:
When the air unit is connected to a flight controller, recording automatically starts when the aircraft is armed. Recording stops and the file is saved when the aircraft is disarmed.
- Automatic Start/Stop:
Disconnecting power before recording has stopped may corrupt the video file. Stop recording manually before powering off the device.
-
- Loop Recording:
Continues recording when the storage is full by deleting the oldest files.
- Loop Recording:
-
- Format SD Card:
Formats the SD card installed in the receiver unit.
- Format SD Card:
-
- Format Air Unit:
Formats the built-in storage or SD card in the air unit.
- Format Air Unit:
-
- Built-In EIS Stabilization:
Enables the built-in electronic image stabilization on the Moonlight. The frame rate must be set to Standard Frame Rate; otherwise, this option will not function.
- Built-In EIS Stabilization:
This function is available only with the Moonlight Kit.
-
- Recording Duration:
Sets the duration of each recorded video file. Available options are 5 minutes, 10 minutes, 30 minutes, and Unlimited.
- Recording Duration:
This setting determines how recordings are divided into separate files. It does not stop recording after the selected duration.
-
- Recording Format:
No alternative formats are currently available. H.264 is the only supported format.
- Recording Format:
-
- Color:
Selects the color preset used for recordings made by the air unit.
- Color:
This function is available only with the Moonlight Kit.
-
- Saturation:
Adjusts the saturation of recordings made by the air unit to make colors appear more vivid or more subdued.
- Saturation:
This function is available only with the Moonlight Kit.
-
- Sharpness:
Adjusts the sharpness of recordings made by the air unit.
- Sharpness:
This function is available only with the Moonlight Kit.
¶ System Menu – Settings – Device
-
- Buzzer:
Adjusts the buzzer volume of the receiver unit.
- Buzzer:
-
- Range Estimation Mode:
Enables the range-estimation function.
- Range Estimation Mode:
The system calculates the distance between the air unit and receiver unit by measuring the wireless transmission time and using the fact that radio waves travel at approximately the speed of light. The estimated measurement error is approximately 100 m.
-
- Signal Loss:
Available options are Warning, Buzzer, and Off.
- Signal Loss:
Warning is enabled by default. When the signal becomes weak, the border of the screen flashes red to alert the pilot that the signal level is low and the aircraft should be returned immediately.
When Buzzer is selected, the buzzer also sounds while the red warning border is flashing.
-
- Factory Reset:
Resets the receiver unit to its factory settings.
- Factory Reset:
If the FCC radio standard has been enabled, it will also be reset to the factory-default CE standard. All saved air unit pairing records will be deleted, and previously connected air units must be paired again.
-
- Reset Air Unit Defaults:
Resets the air unit camera parameters without deleting the pairing status.
- Reset Air Unit Defaults:
-
- Device Information:
Displays the current hardware and firmware versions of the device.
- Device Information:
-
- Operating Instructions:
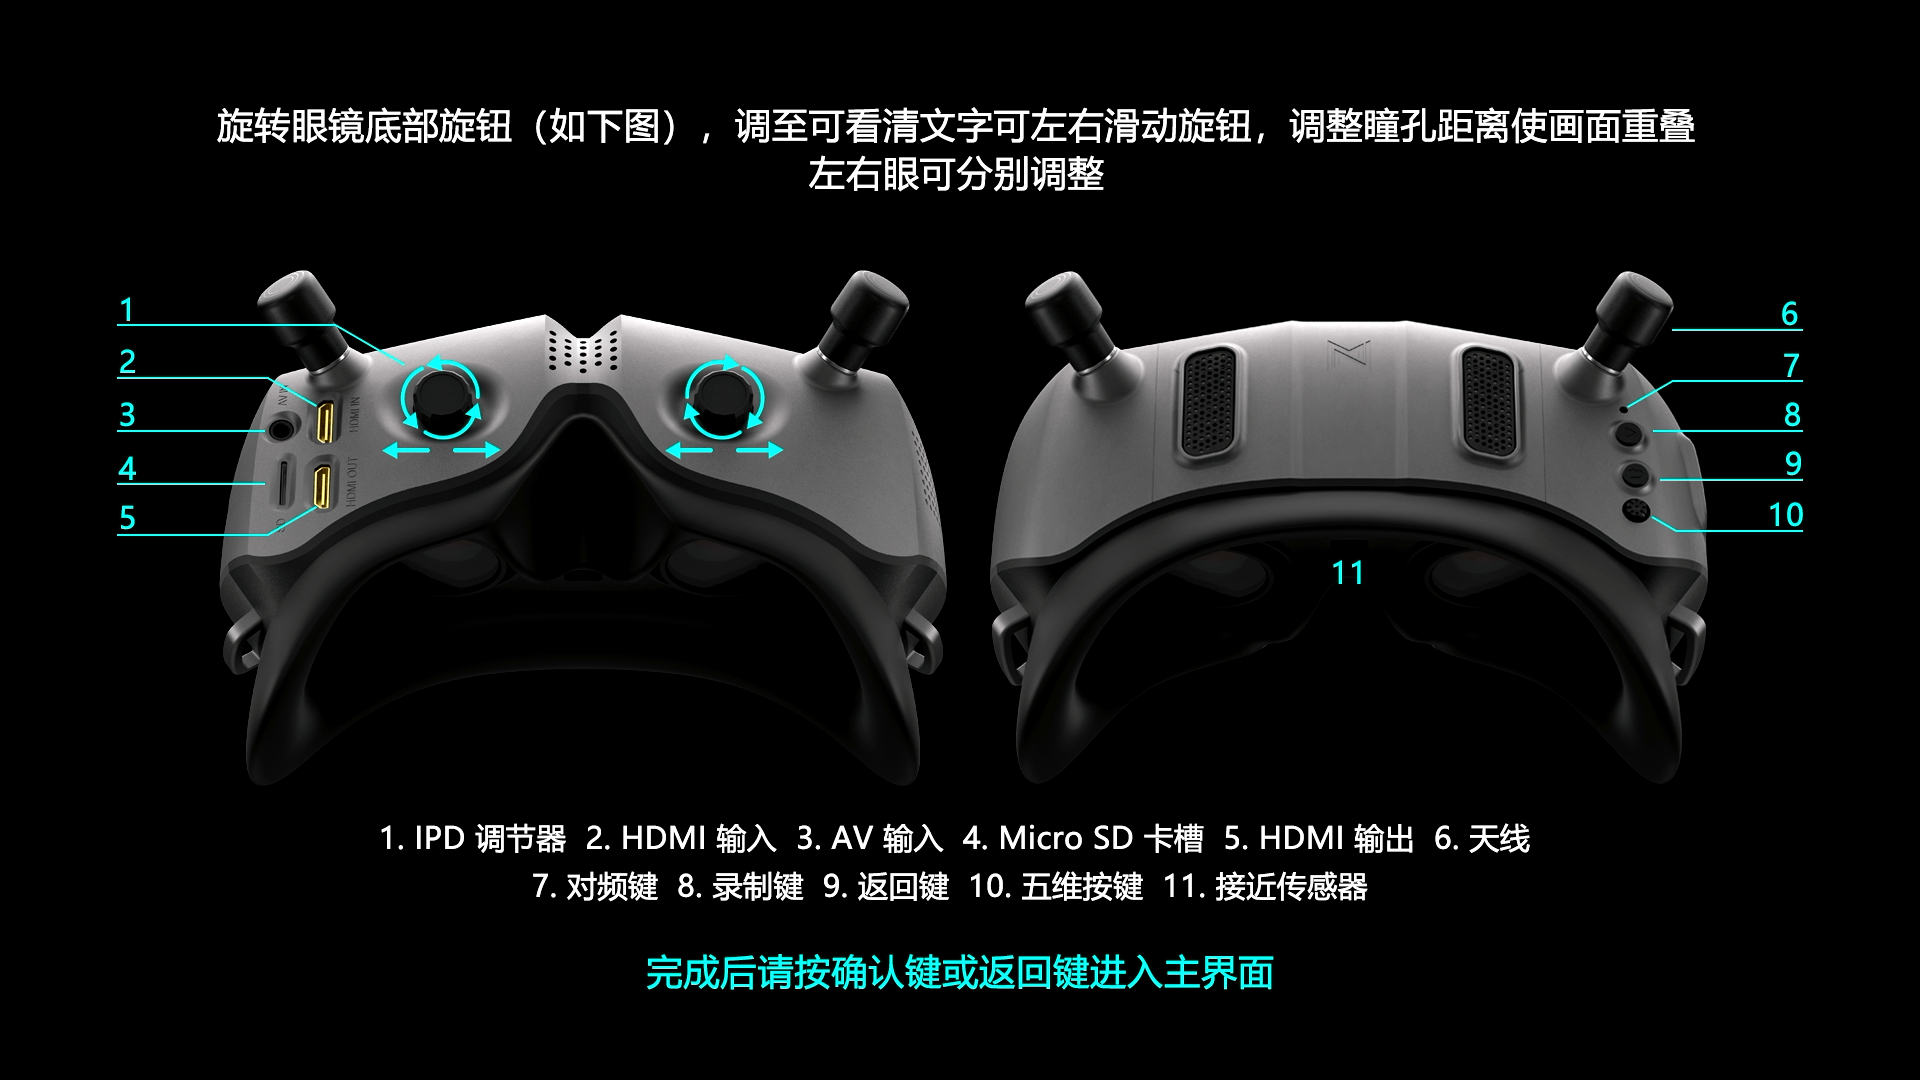
See the diagram above
- Operating Instructions:
Select this option to view an overview of the device controls and components.
-
- Switch Mode:
Switches between the available system operating modes. Standard Mode and Race Mode are available by default. Repeater Mode becomes available after it is unlocked.
- Switch Mode:
-
- LED Color:
Changes the color of the LED on the front cover of the receiver unit. This function is supported only by Goggles X and Goggles L.
- LED Color:
-
- Receiver Unit Recording and Wi-Fi Bitrate:
Sets the recording bitrate of the receiver unit. Available options are 5, 10, 15, 20, 30, 40, and 50 Mbps.
- Receiver Unit Recording and Wi-Fi Bitrate:
Higher values produce larger video files. The default setting is 40 Mbps.
This setting also limits the Wi-Fi transmission bandwidth of Goggles X. Setting the bitrate too high may cause stuttering and increased latency when previewing video through the app.
-
- Anti-Flicker:
Adjusts the camera exposure time to reduce flickering from artificial lighting in recorded video. This setting does not directly adjust the shutter speed.
- Anti-Flicker:
Do not enable this function during daytime operation. Doing so may cause the image to turn completely white during flight.
This function is available only with the Moonlight Kit.
-
- Head Tracking:
Enables head tracking when supported by the connected equipment.
Supported Device List
- Head Tracking:
When head tracking is enabled, moving your head during flight controls the gimbal yaw and pitch directions.